Oracle Solutions We believe in delivering tangible results for our customers in a cost-effective manner
Installation Of Oracle Database Release 11.2.0.3 on Oracle Enterprise Linux(OEL) 6.4
First download the media from below given link:
http://www.oracle.com/technetwork/database/enterprise-edition/downloads/index.html
For creating a Virtual machine kindly refer to the Blog Creating Virtual Machine in Virtual Box
Copy the media in OEL
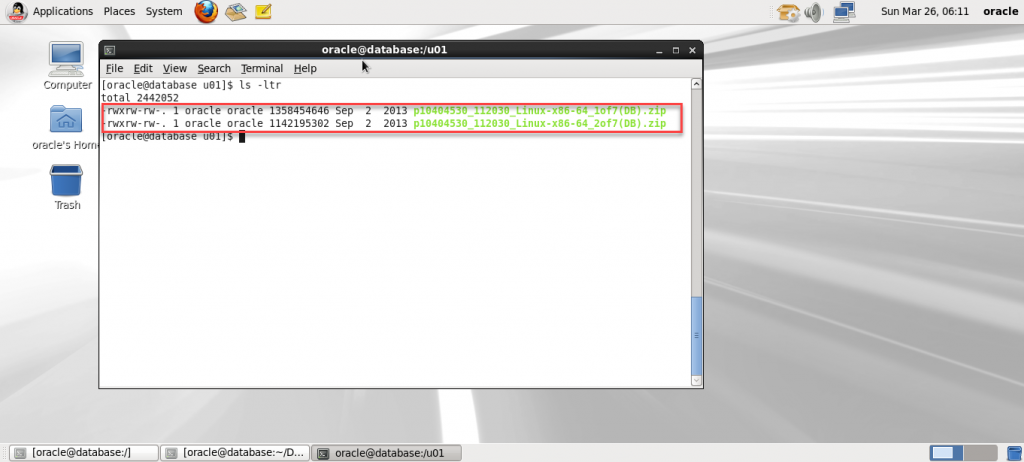
Unzip both the folders by Using Following Given Commands:
unzip p10404530_112030_Linux-x86-64_1of7\(DB\).zip
unzip p10404530_112030_Linux-x86-64_2of7\(DB\).zip
Operating System Settings
If you are planning to use the “oracle-rdbms-server-11gR2-preinstall” package to perform all your prerequisite setup, follow the instructions at http://public-yum.oracle.com.
If you have internet available on your server then you can run below command directly:
# yum install oracle-rdbms-server-11gR2-preinstall
Oracle recommend the following minimum parameter settings.
fs.suid_dumpable = 1
fs.aio-max-nr = 1048576
fs.file-max = 6815744
kernel.shmall = 2097152
kernel.shmmax = 536870912
kernel.shmmni = 4096
kernel.sem = 250 32000 100 128
net.ipv4.ip_local_port_range = 9000 65500
net.core.rmem_default = 262144
net.core.rmem_max = 4194304
net.core.wmem_default = 262144
net.core.wmem_max = 1048586
Current values can be tested using the following command.
/sbin/sysctl -a | grep <param-name>
If there is any change in the values of the parameter above edit the following lines in the /etc/sysctl.conf file.
fs.suid_dumpable = 1
fs.aio-max-nr = 1048576
fs.file-max = 6815744
kernel.shmall = 2097152
kernel.shmmax = 536870912
kernel.shmmni = 4096
# semaphores: semmsl, semmns, semopm, semmni
kernel.sem = 250 32000 100 128
net.ipv4.ip_local_port_range = 9000 65500
net.core.rmem_default=262144
net.core.rmem_max=4194304
net.core.wmem_default=262144
net.core.wmem_max=1048586
Run the following command to change the current kernel parameters.
/sbin/sysctl –p
Now, Add the following lines to the /etc/security/limits.conf file.
oracle soft nproc 16384
oracle hard nproc 16384
oracle soft nofile 4096
oracle hard nofile 65536
oracle soft stack 10240
Now, We will Create User and Groups for the Installation of Database 11g. Open the terminal and copy the following below commands to create User and Groups
groupadd -g 501 oinstall
groupadd -g 502 dba
groupadd -g 503 oper
groupadd -g 504 asmadmin
groupadd -g 506 asmdba
groupadd -g 505 asmoper
useradd -u 502 -g oinstall -G dba,asmdba,oper oracle
passwd oracle
Now, Amend the /etc/security/limits.d/90-nproc.conf file as described below.
# Change this
* soft nproc 1024
# To this
* – nproc 16384
Now, Create directories in which the Oracle Database 11g will be installed. Open the terminal and copy the below given commands:
mkdir -p /u01/app/oracle/product/11.2.0/db_1
chown -R oracle:oinstall /u01
chmod -R 775 /u01
Bash Profile Setting
Now, Login as the oracle user and add the following lines at the end of the .bash_profile file placed in /home/oracle directory.
TMP=/tmp; export TMP
TMPDIR=$TMP; export TMPDIR
ORACLE_HOSTNAME=localhost.localdomain; export ORACLE_HOSTNAME
ORACLE_UNQNAME=ORCL; export ORACLE_UNQNAME
ORACLE_BASE=/u01/app/oracle; export ORACLE_BASE
ORACLE_HOME=$ORACLE_BASE/product/11.2.0/db_1; export ORACLE_HOME
ORACLE_SID=ORCL; export ORACLE_SID
PATH=/usr/sbin:$PATH; export PATH
PATH=$ORACLE_HOME/bin:$PATH; export PATH
LD_LIBRARY_PATH=$ORACLE_HOME/lib:/lib:/usr/lib; export LD_LIBRARY_PATH
CLASSPATH=$ORACLE_HOME/jlib:$ORACLE_HOME/rdbms/jlib; export CLASSPATH
NOTE: Put the Oracle_SID and ORACLE_HOSTNAME according to your Environment
Database Installation Steps:
Now For starting Installation go to the directory where database setup files are unzipped and run Installer.


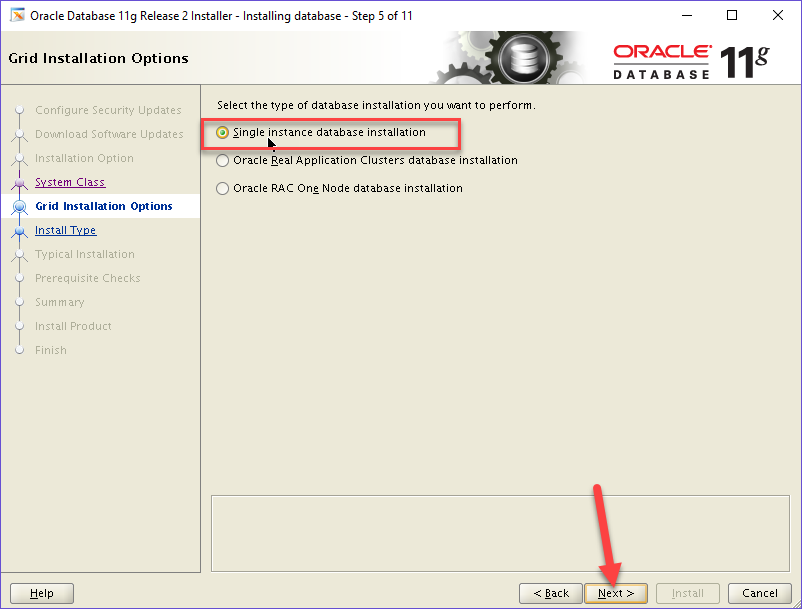


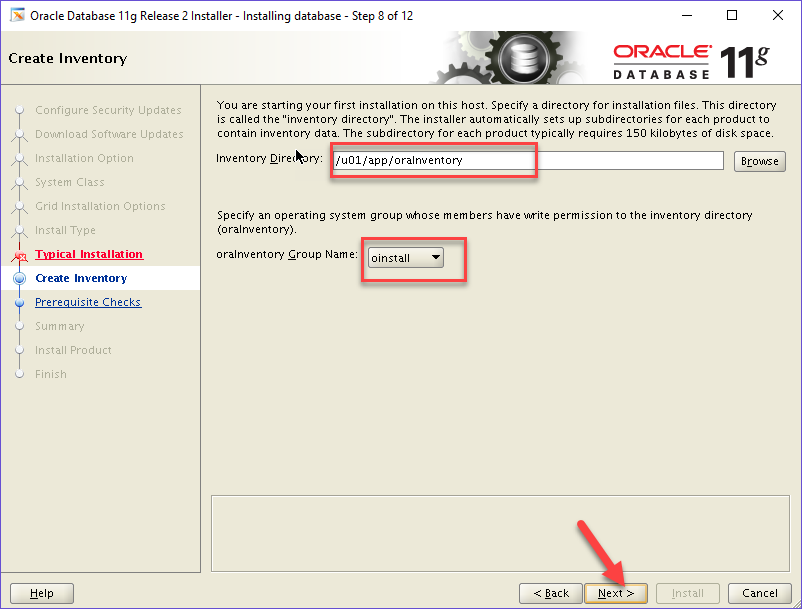

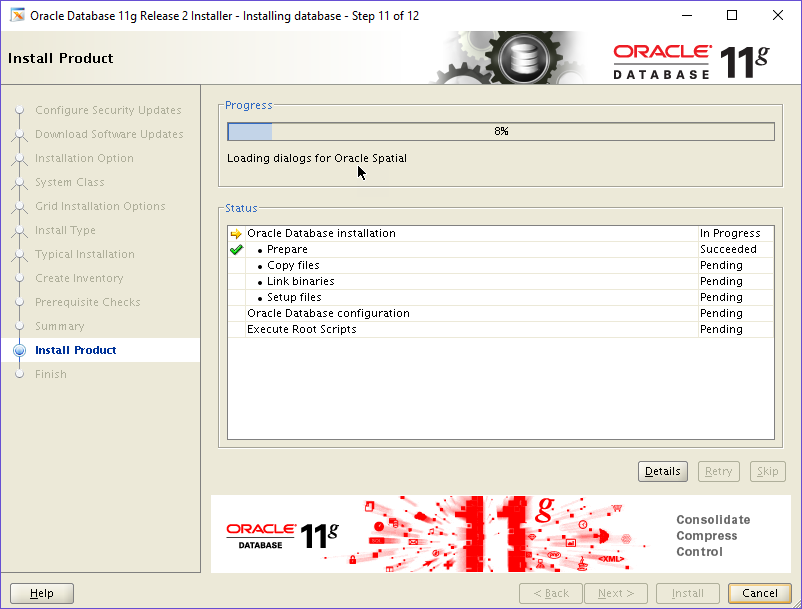
Installation will be started, it will take atleast 20 minutes to install and create Database 11g
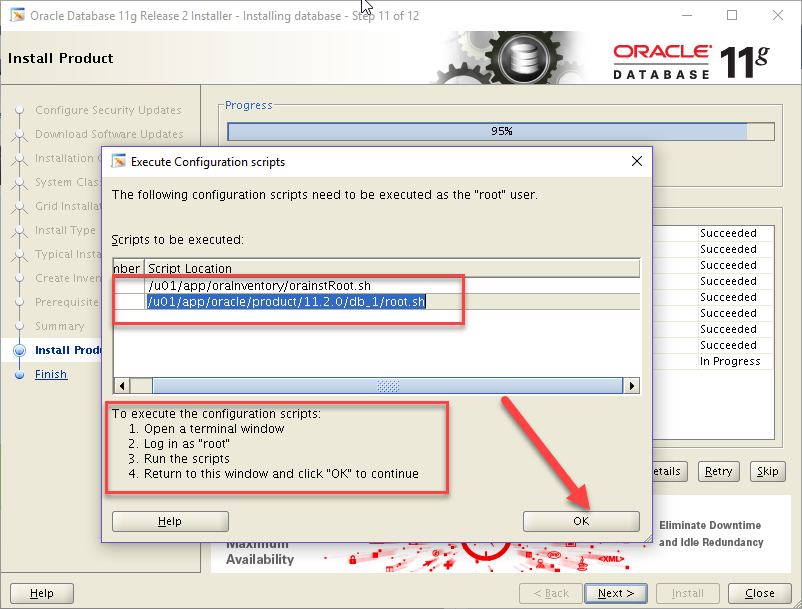
Execute the following scripts on terminal window with ROOT User
/u01/app/oraInventory/orainstRoot.sh
/u01/app/oracle/product/11.2.0/db_1/root.sh
Then Click Ok.


Congradulations!!!!Your Oracle Database 11g Version 11.2.0.3 has been Installed!!!!!