 Oracle Solutions We believe in delivering tangible results for our customers in a cost-effective manner
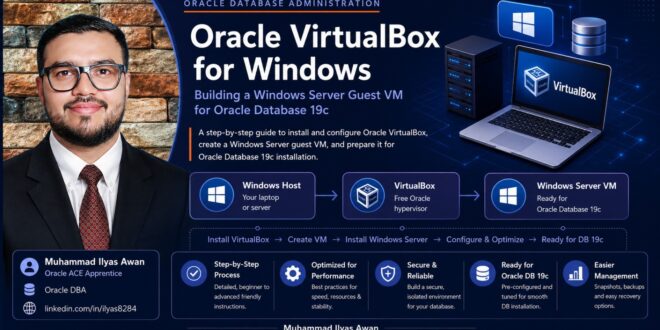
Oracle VirtualBox for Windows
Windows Server Guest VM
Part I — Understanding This Approach
1.1 Why Build a Windows Server Guest VM?
The ORDS and APEX guides in this series are written against a Windows Server host running Oracle Database 19c directly. If you do not have a spare physical Windows Server, or you simply do not want to risk your everyday machine, you can build that exact target as a virtual machine instead using Oracle VirtualBox on whatever computer you already have.
The VM behaves like a real Windows Server for every purpose that matters here: installing software, editing the registry and PATH, running services, and being reachable over the network from your host.
1.2 Windows Server Guest vs. Oracle Linux Guest
This series also includes a companion guide that builds an Oracle Linux guest VM instead. Both are valid lab targets choose based on what you are trying to practice:
- Choose a Windows Server guest (this guide) if you are following this series’ ORDS and APEX guides as written, or if your organization actually runs Oracle Database on Windows
- Choose an Oracle Linux guest (the companion guide) if you want to practice against the platform Oracle Database is most commonly certified and run on in production
Companion guide Oracle VirtualBox Lab Environment Guide (Oracle Linux guest), also from this series.
1.3 Where This Fits in the Series
Your Computer (any OS)
↓ hosts
Oracle VirtualBox
↓ runs
Windows Server VM this guide
↓ installed inside the VM
Oracle Database 19c
↓ served by
ORDS → Oracle APEX 26.2
Take a snapshot before every risky step. A Windows Server VM you can roll back in seconds is far more forgiving than the one production server you cannot afford to break.
Part II — Building the Windows Server Guest VM
This walkthrough installs Oracle VirtualBox on a Windows host and builds a Windows Server virtual machine that is ready to stand in for physical hardware in this series’ Oracle Database 19c, ORDS, and APEX guides. Each step lists the exact actions to take and what to expect back.
Step 1 — Prerequisites
Before installing VirtualBox, confirm the following on the host machine:
- Hardware virtualization (Intel VT-x or AMD-V) is enabled in the BIOS/UEFI
- A 64-bit host operating system with Oracle VirtualBox support (Windows, macOS, or Linux)
- At least 16 GB of RAM on the host Windows Server guests are noticeably heavier than Linux guests
- At least 100 GB of free disk space for the virtual machine
Windows host note If Hyper-V, Windows Hypervisor Platform, WSL2, or Windows Sandbox are enabled on the host, they can conflict with VirtualBox’s own virtualization. See Problem 1 in Step 15 if the VM fails to start.
Step 2 — Download Oracle VirtualBox
Download the installer for your host platform from Oracle’s official VirtualBox downloads page. On a Windows host, the file will have a name similar to:
VirtualBox-7.x.x-xxxxxx-Win.exe
Always take the current stable release rather than hard-coding an old version into your process.
Step 3 — Install VirtualBox on the Host
Run the installer and accept the defaults, including the network interface components it installs. Host networking may briefly drop while those components load this is expected. Reboot the host if prompted.
Step 4 — Install the Extension Pack
Download the Extension Pack matching your VirtualBox version exactly, then add it:
VirtualBox Manager → File → Tools → Extension Pack Manager → Install
For a Windows Server guest, this also enables USB 2.0/3.0 passthrough and RDP-over-VRDE to the VM console, both of which are convenient once the guest is running headless.
Step 5 — Download a Windows Server Evaluation ISO
Download a free, time-limited evaluation ISO of Windows Server (2022 or later) from Microsoft’s Evaluation Center. For example:
WindowsServer_Eval_en-us.iso
Note — Evaluation media is fully featured but expires after 180 days. That is generally plenty of time for a lab, and the license can be rearmed a limited number of times; for anything longer-lived, use a properly licensed ISO instead.
Step 6 — Create a New Virtual Machine
In VirtualBox Manager, click New and provide:
Name: WIN-DB19C-LAB
Type: Microsoft Windows
Version: Windows 2022/2025 (64-bit)
Memory: 8192 MB (4096 MB minimum)
CPU: 2 vCPUs (minimum)
These values are comfortable for a lab running Windows Server plus Oracle Database 19c; production sizing is a separate exercise.
Step 7 — Configure the Virtual Hard Disk
When prompted for a disk, choose:
Create a virtual hard disk now
File type: VDI (VirtualBox Disk Image)
Storage: Dynamically allocated
Size: 100 GB or more
Windows Server itself, Oracle Database 19c, ORDS, and APEX together need more room than a minimal Linux install — do not undersize this disk.
Step 8 — Configure Networking
Open the VM’s Settings → Network and configure two adapters:
Adapter 1: NAT (internet access for Windows Update and downloads)
Adapter 2: Host-only Adapter (stable IP for RDP / SQL*Net from the host)
The Host-only adapter gives the VM a private, stable IP address your host can always reach this is what you will use for Remote Desktop in Step 12, and later to reach ORDS/APEX in a browser once they are installed inside this VM.
Step 9 — Attach the ISO and Boot the VM
Attach the installation media and start the VM:
Settings → Storage → Optical Drive → choose the Windows Server evaluation ISO
Click Start. The VM should boot from the ISO into the Windows Server installer.
Step 10 — Install Windows Server
Walk through the installer:
- Choose your language and keyboard layout, then click Install now
- Select the Desktop Experience edition the full GUI is easier to work in for a lab than Server Core
- Choose Custom: Install Windows only, then select the virtual disk
- Set a strong local Administrator password when prompted, then let setup finish and sign in
Once signed in, open Server Manager and set a host name you will recognize later, for example WIN-DB19C-LAB, then restart.
Step 11 — Install VirtualBox Guest Additions
With the VM running and signed in, mount the Guest Additions image:
VirtualBox Manager → Devices → Insert Guest Additions CD image
In File Explorer inside the VM, open the mounted drive and run VBoxWindowsAdditions.exe as Administrator, accept the defaults, and reboot when prompted. Guest Additions give the VM a proper video driver, a shared clipboard with the host, and shared folder support.
Step 12 — Enable Remote Desktop and Verify Connectivity
Inside the VM, enable Remote Desktop so you can work from the host without keeping the VirtualBox console window open:
Server Manager → Local Server → Remote Desktop → Enable
Find the VM’s host-only IP address:
ipconfig
From the host, confirm connectivity and connect:
ping <vm-host-only-ip>
mstsc /v:<vm-host-only-ip>
This is the same path you will later use to reach ORDS and APEX from a browser on the host, once Oracle Database 19c, ORDS, and APEX are installed inside this VM.
To move installer files into the VM without repeated downloads, add a shared folder:
Settings → Shared Folders → add a host folder, enable Auto-mount
With Guest Additions installed, the folder appears inside the VM under VBOXSVR<foldername> in File Explorer, and can be mapped as a network drive if you want a permanent letter.
Step 14 — Take a Baseline Snapshot
Before installing anything else, capture a clean starting point:
VirtualBox Manager → Snapshots → Take → “Clean Windows Server – before DB19c install”
Tip — Take another snapshot immediately after the Oracle Database 19c installation succeeds, and again once ORDS and APEX are configured. Each snapshot is a free rollback point if a later step goes wrong.
Step 15 — Common Problems
Problem 1 — “VT-x is not available” when starting the VM
Hardware virtualization is disabled in the BIOS/UEFI, or another hypervisor (Hyper-V, WSL2, Windows Sandbox) is holding it on the host. Enable VT-x/AMD-V in the BIOS, or if you must disable Hyper-V entirely:
bcdedit /set hypervisorlaunchtype off
This requires a host reboot, and Hyper-V/WSL2 features are unavailable on the host while it is off.
Problem 2 — Cannot RDP into the VM
Confirm Remote Desktop is enabled inside the VM, and that the Windows Firewall on the guest allows Remote Desktop connections. Also confirm the Host-only adapter is configured and you are using the correct IP from ipconfig.
Problem 3 — No internet access inside the VM
Confirm Adapter 1 is attached to NAT and enabled, and that the guest network profile is set to allow outbound traffic.
Re-run VBoxWindowsAdditions.exe as Administrator and reboot fully Guest Additions on Windows sometimes need a second reboot before shared folders and the clipboard start working correctly.
Problem 5 — The VM feels extremely slow, or Windows Update keeps running
Check that the VM has at least the memory and CPU values from Step 6. A freshly installed evaluation image often pulls a large batch of Windows Updates on first boot let that finish once, ideally before taking your baseline snapshot in Step 14.
Problem 6 — The evaluation license is about to expire
Evaluation media is valid for 180 days and can be rearmed a limited number of times with slmgr /rearm. When you run out of rearms, roll back to your baseline snapshot and reinstall from a fresh evaluation ISO, or move to properly licensed media.
Step 16 — Lab Readiness Checklist
At the end you should be able to confirm each of these:
- Oracle VirtualBox and the matching Extension Pack are installed on the host
- The Windows Server VM is created with adequate memory, CPU, and disk
- NAT and Host-only network adapters are both configured
- Windows Server is installed, with a host name and Administrator password set
- VirtualBox Guest Additions are installed and the VM has rebooted successfully
- Remote Desktop is enabled, and you can ping and RDP into the VM from the host
- A shared folder is available for moving installation files, if needed
- A baseline snapshot exists, taken before any database software is installed
The Most Important Point
This VM is not the destination it is the stand-in for hardware you may not have. Get networking, Remote Desktop, and a clean snapshot right here, and every guide that follows in this series Oracle Database 19c, ORDS, and APEX runs on it exactly as it would on a physical Windows Server.
With this lab environment ready, the natural next step is:
Windows Server VM (this guide) → Oracle Database 19c install → ORDS → Oracle APEX 26.2
- Oracle VirtualBox for Windows - Windows Server Guest VM
Oracle VirtualBox for Windows - Windows Server Guest VM