 Oracle Solutions We believe in delivering tangible results for our customers in a cost-effective manner
Part I — Understanding Oracle APEX
1.1 What Is Oracle APEX?
Oracle Application Express (APEX) is a low-code development platform built into every Oracle Database. It lets you design, build, and deploy web applications directly on top of your existing data, using a browser-based builder instead of a traditional client-side development stack.
APEX itself is not a separate server product the APEX engine runs as PL/SQL inside Oracle Database. What you install is the APEX schema, its supporting metadata, and the static resources (images, CSS, JavaScript) that a web tier needs to render the APEX interface.
1.2 How APEX, ORDS, and Oracle Database Fit Together
Since Oracle Database 18c, Oracle REST Data Services (ORDS) is the supported way to serve APEX over HTTP/HTTPS — the older embedded PL/SQL gateway is no longer used for new installations. The request path looks like this:
Browser
↓ HTTP / HTTPS
ORDS (serves APEX engine calls + static images)
↓ JDBC
Oracle Database 19c
- APEX engine (PL/SQL) • APEX_* schema • Your application schema
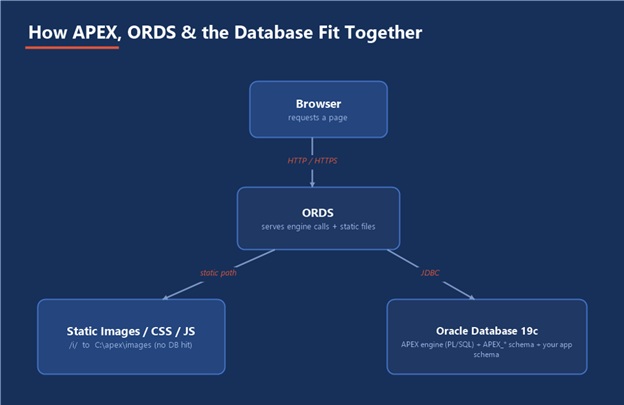
Figure 1 — How a browser request reaches APEX, split between the dynamic engine path and the static-file path
Prerequisite: This guide assumes ORDS is already installed and configured in Standalone Mode on this Windows Server, as covered in the companion guide Oracle REST Data Services (ORDS) Concepts & Installation Guide. If ORDS is not yet installed, complete that guide first.
1.3 What You Get After Installation
Installing APEX adds the following to your environment:
- The APEX engine and metadata schema inside Oracle Database 19c
- An INTERNAL administration workspace with an ADMIN account
- The ability to create developer workspaces, each mapped to one or more database schemas
- A browser-based App Builder, SQL Workshop, and RESTful Services editor
- Static images/CSS/JavaScript that ORDS serves directly, without hitting the database for every asset
Oracle APEX is the application layer; ORDS is the transport layer; Oracle Database is the data and logic layer. Installing APEX means wiring all three together correctly
Part II — Installing APEX 26.2 on Oracle Database 19c
This walkthrough installs Oracle APEX 26.2 into an Oracle Database 19c instance and serves it through an existing ORDS Standalone Mode installation on Windows Server. Each step lists the exact commands to run and what to expect back.
Target Architecture
We will build this on top of the existing ORDS installation:
Windows Server
├─ Oracle Database 19c
│ └─ APEX 26.2 schema + metadata (installed by apexins.sql)
├─ ORDS Standalone (already installed)
│ ├─ Serves the APEX engine at /ords/
│ └─ Serves APEX static images at /i/ (standalone.static.path)
└─ C:apex (extracted APEX software — images, install scripts)
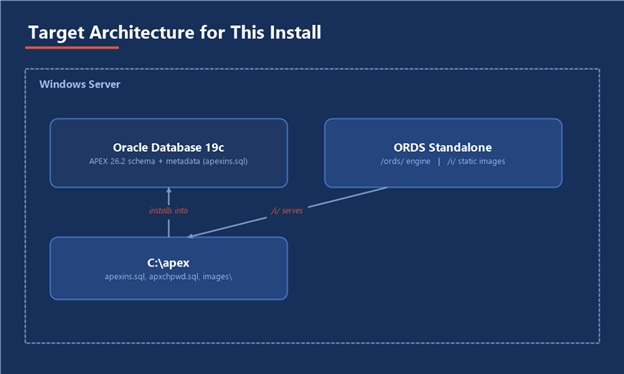
Figure 2 — The three moving parts this walkthrough wires together on Windows Server
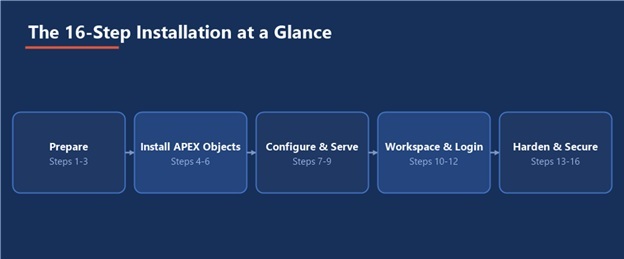
Figure 3 — The 16 steps ahead, grouped into five phases
Step 1 — Prerequisites
Before installing APEX, confirm the following:
- Oracle Database 19c is running and reachable
- ORDS is already installed and can serve requests in Standalone Mode
- You know which container you are installing into (CDB root vs. a specific PDB)
- SYSAUX (or a dedicated APEX tablespace) has enough free space — budget at least 1 GB
Check free space in the target tablespace:
SELECT tablespace_name, ROUND(SUM(bytes)/1024/1024) AS free_mb
FROM dba_free_space
GROUP BY tablespace_name;
If you are using a PDB, connect to it first:
ALTER SESSION SET CONTAINER=ORCLPDB;
Step 2 — Download Oracle APEX
Download Oracle APEX 26.2 from Oracle’s official APEX download page. The file will have a name similar to:
apex_26.2.zip
Always match the APEX version to what your organization has certified, and check the release notes for any database patch requirements before proceeding.
Step 3 — Extract the APEX Software
Extract the ZIP so that its contents land directly under:
C:apex
├─ apexins.sql
├─ apxchpwd.sql
├─ apex_rest_config.sql
└─ images
The images folder is what ORDS will later serve directly keep it in place; do not move or rename it after configuring ORDS in Step 7.
Step 4 — Install the APEX Database Objects
Open a Command Prompt, move into the APEX directory, and connect as SYSDBA:
cd C:apex
sqlplus sys@ORCLPDB as sysdba
Run the installer, supplying the APEX tablespace, the APEX files tablespace, the temporary tablespace, and the images virtual directory:
SQL> @apexins.sql SYSAUX SYSAUX TEMP /i/
This step writes a detailed log and can take 20–40 minutes depending on hardware. When it finishes, check the log for:
No errors.
Tip: If you plan to keep APEX objects separate from SYSAUX, create a dedicated tablespace (for example APEX_TS) beforehand and use its name in place of the first SYSAUX argument above.
Step 5 — Set the APEX Administrator Password
Still connected as SYSDBA in the same session, set the password for the built-in ADMIN account of the INTERNAL workspace:
SQL> @apxchpwd.sql
You will be prompted to enter and confirm a new ADMIN password. Choose a strong, unique password this account has full administrative control over every workspace in this database.
Step 6 — Configure REST Data Services for APEX
APEX needs its own ORDS-facing runtime accounts to process page requests over REST. Run:
SQL> @apex_rest_config.sql
This prompts for passwords for the ORDS-facing APEX accounts, including APEX_PUBLIC_USER and APEX_REST_PUBLIC_USER. Record these passwords you will not be prompted for them again unless you rerun this script.
You can now exit SQL*Plus:
SQL> exit
Step 7 — Point ORDS to the APEX Static Images
ORDS Standalone Mode can serve the APEX images directory itself, without a separate web server. Tell it where the images live and under which URL path:
ords –config C:ords-config config set standalone.static.context.path /i
ords –config C:ords-config config set standalone.static.path C:apeximages
This matches the /i/ virtual directory you supplied to apexins.sql in Step 4: APEX pages reference images at that path, so the two settings must agree.
Step 8 — Verify the ORDS Configuration
Confirm the settings were saved:
ords –config C:ords-config config list
You should see standalone.static.context.path and standalone.static.path listed with the values from Step 7.
Step 9 — Start ORDS and Access APEX
Start (or restart) ORDS so it picks up the new static path configuration:
ords –config C:ords-config serve
Open a browser to:
http://localhost:8080/ords/
You should see the APEX sign-in page, with images and styling loading correctly. If the page loads but looks unstyled, revisit Step 7 that almost always means the static image path is wrong or ORDS was not restarted after changing it.
Step 10 — Sign In to the Administration Console
Navigate to the Administration Services console:
http://localhost:8080/ords/apex_admin
Sign in with:
Workspace: INTERNAL
Username: ADMIN
Password: (set in Step 5)
From here you can manage workspaces, instance settings, and feature configuration for the whole APEX installation.
Step 11 — Create Your First Workspace
In the Administration console, go to Manage Workspaces → Create Workspace, and provide:
- A workspace name (for example, HR_APP)
- An existing database schema, or a new schema/user for APEX to create
- A workspace administrator username and password
Each workspace is an isolated development area mapped to one or more schemas this is the boundary APEX developers normally work inside, separate from the INTERNAL administration workspace.
Step 12 — Verify a Workspace Login
Sign out of the Administration console and go back to the main sign-in page:
http://localhost:8080/ords/
Sign in using the workspace name, workspace administrator username, and password created in Step 11. A successful login lands you in the App Builder home page for that workspace.
Step 13 — Configure Email (SMTP) for APEX
APEX uses SMTP for password resets, notifications, and application-generated email. Configure it either from Administration → Manage Instance → Instance Settings → Email, or directly in SQL*Plus:
BEGIN
APEX_INSTANCE_ADMIN.SET_PARAMETER(‘SMTP_HOST_ADDRESS’,’smtp.example.com’);
APEX_INSTANCE_ADMIN.SET_PARAMETER(‘SMTP_HOST_PORT’,’587′);
COMMIT;
END;
This step is optional for a lab installation but required before relying on password-reset emails or application notifications in production.
Step 14 — Enable HTTPS for Production
The Standalone Mode configuration above is suitable for learning, development, and testing. For production:
Production recommendation: Configure ORDS with an SSL certificate (or place a reverse proxy in front of it) so APEX is only reachable over HTTPS, and disable the plain HTTP listener once HTTPS is confirmed working.
Also review session timeout, Content Security Policy headers, and workspace-level access controls in Administration → Manage Instance before exposing this installation beyond your internal network.
Step 15 — Common Installation Problems
Problem 1 — Sign-in page loads with no images or styling
The static image path is wrong, or ORDS was not restarted after Step 7. Re-check standalone.static.path and standalone.static.context.path with ords config list, then restart ORDS.
Problem 2 — apexins.sql fails with an out-of-space error
The target tablespace does not have enough free space. Extend the tablespace’s datafile or add a datafile, then rerun the installer — it is safe to run apexins.sql again.
Problem 3 — Cannot sign in to INTERNAL / ADMIN
The ADMIN password was not set, was mistyped, or has expired. Reconnect as SYSDBA and rerun:
SQL> @apxchpwd.sql
Problem 4 — REST/AJAX calls in an app fail intermittently
This usually points back to apex_rest_config.sql not having been run, or the APEX_PUBLIC_USER account being locked or expired. Check its status:
SELECT username, account_status FROM dba_users
WHERE username IN (‘APEX_PUBLIC_USER’,’APEX_REST_PUBLIC_USER’);
Problem 5 — Installed APEX into the wrong container
If you ran apexins.sql against the CDB root instead of the intended PDB, reconnect with the correct ALTER SESSION SET CONTAINER statement from Step 1 and rerun the installer inside that PDB. APEX installed at the CDB level is not visible to sessions connecting to a PDB.
Step 16 — Post-Installation Checklist
At the end you should be able to confirm each of these:
- APEX 26.2 database objects are installed with no errors in the log
- The ADMIN password is set and recorded in a secure location
- sql has been run and the passwords are recorded
- ORDS is configured with the correct static image path and context path
- The APEX sign-in page loads correctly, with images and styling
- You can sign in to the INTERNAL workspace as ADMIN
- At least one developer workspace has been created
- You can sign in to that workspace and reach the App Builder
- SMTP is configured, or explicitly deferred for a later stage
- HTTPS and production hardening are planned before this instance is exposed externally
The Most Important Point
An APEX installation is not just “the schema is there and the sign-in page loads.” It is a chain: Oracle Database 19c → APEX engine → ORDS → Workspace → Application. Every step in this guide exists to make one link in that chain reliable.
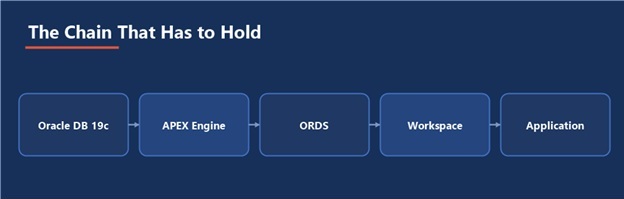
Figure 4 — Five links, one chain this guide exists to keep every one of them solid
Once that chain is solid, the next level becomes much easier:
Installation → Workspace Setup → App Builder → Shared Components → RESTful Services → Security & Session Config → Production Deployment
- Apex 26.2 installations
Apex 26.2 installations