 Oracle Solutions We believe in delivering tangible results for our customers in a cost-effective manner
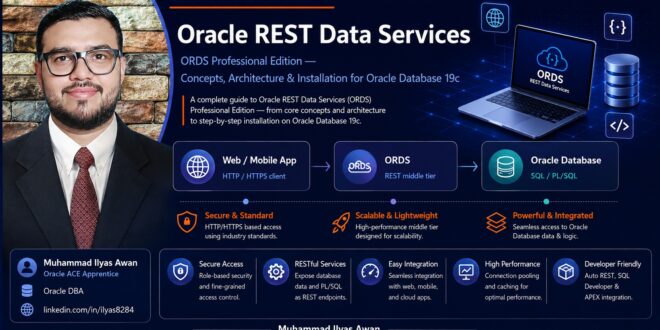
Part I — Understanding Oracle REST Data Services
1.1 What Is ORDS?
Oracle REST Data Services (ORDS) is Oracle’s Java-based middle tier that lets applications and external clients access Oracle Database through RESTful APIs over HTTP/HTTPS.
In short, ORDS acts as a bridge between a web or application client and Oracle Database.
Without ORDS
A traditional application connects directly to Oracle Database:
Application → Oracle Database
With ORDS
ORDS provides a REST-based layer in front of the database:
Web / Mobile / Application
↓ HTTP / HTTPS
ORDS
↓ SQL / PL/SQL
Oracle Database
For example, an application could call GET /ords/hr/employees. ORDS processes the request and returns the result as a REST response commonly JSON.
1.2 What Can ORDS Do?
ORDS can be used to:
- Expose Oracle data through REST APIs
- Execute SQL and PL/SQL through REST-enabled services
- Support web and mobile applications
- Provide the REST foundation used by Oracle APEX
- Support authentication and authorization mechanisms
- Integrate Oracle Database with external applications
- Support cloud and hybrid architectures
1.3 A Practical Example
Suppose your Oracle database has a table:
EMPLOYEES
EMP_ID NUMBER
FIRST_NAME VARCHAR2
LAST_NAME VARCHAR2
SALARY NUMBER
DEPARTMENT_ID NUMBER
Instead of giving an external application direct database credentials, you can expose a controlled REST endpoint:
GET /ords/hr/employees
The application sends an HTTP request:
GET https://server.example.com/ords/hr/employees
ORDS communicates with Oracle Database, executes the appropriate SQL/PL/SQL logic, and returns the result:
Client
↓ HTTPS
ORDS
↓ JDBC
Oracle Database
↓ SQL / PL/SQL
Result set
1.4 ORDS vs. Oracle Database
A common misunderstanding: “Is ORDS another database?” — No. ORDS is a middle-tier service; your data remains in Oracle Database.
Think of it this way:
|
Component |
Responsibility |
|
Oracle Database |
Stores and processes data |
|
PL/SQL |
Implements database-side business logic |
|
ORDS |
Exposes database functionality through REST |
|
APEX |
Provides low-code application development |
|
Browser / Mobile App |
Consumes the services |
1.5 Why ORDS Matters for a DBA
ORDS changes how applications interact with Oracle Database. Instead of exposing database connectivity directly:
Application → Database
you can create a controlled API layer:
Application → ORDS → Database
This becomes particularly useful for APIs, integrations, Oracle APEX applications, mobile applications, ERP integrations, and cloud architectures.
Oracle REST Data Services (ORDS) is a Java-based tier that enables secure RESTful access to Oracle Database and its SQL/PL/SQL capabilities, over HTTP/HTTPS.
Part II — Installing ORDS on Oracle Database 19c
This walkthrough installs ORDS in Standalone Mode on Windows Server against an Oracle Database 19c target. Each step lists the exact commands to run and what to expect back.
Step 1 — Target Architecture
We will build this:
Windows Server
├─ Java 17
├─ Oracle Database 19c
│ └─ ORDS Repository (metadata schema)
├─ ORDS Product (software)
├─ ORDS Configuration (–config directory)
└─ ORDS Standalone
└─ HTTP / HTTPS → Browser / Application
For this installation we will use ORDS Standalone Mode. Standalone Mode is excellent for learning, development, testing, and controlled environments. For production, you would normally put HTTPS and appropriate infrastructure in front of ORDS.
Step 2 — Prerequisites
Before installing ORDS, verify these components.
Database
Oracle Database: Oracle Database 19c. Check:
SELECT banner_full FROM v$version;
You should see Oracle Database 19c information. Also verify the listener:
lsnrctl status
Test the Oracle Database service:
tnsping ORCL
Replace ORCL with your actual Oracle Database service/TNS alias.
Step 3 — Install Java 17
Current ORDS documentation supports Java 17, 21, and 25. For this installation, use Java 17. After installation, open a Command Prompt:
java -version
You should see something similar to:
java version “17.x.x”
Then check:
where java
Step 4 — Configure JAVA_HOME
On Windows define JAVA_HOME. For example:
C:Program FilesJavajdk-17
Then add %JAVA_HOME%bin to the Windows PATH. Verify:
echo %JAVA_HOME%
java -version
Step 5 — Download Oracle ORDS
Download the ORDS distribution from Oracle’s official ORDS download page (“Oracle REST Data Services Downloads”). The downloaded file will have a name similar to:
ords-26.x.x.zip
The exact version changes over time, so do not hard-code an old version into your installation procedure.
Step 6 — Create the ORDS Directories
Separate the ORDS software from its configuration. For example:
C:ords
C:ords-config
Extract the ORDS ZIP into C:ords. You should have something like:
C:ords
├─ bin
├─ lib
└─ …
The important directory is C:ordsbin. Oracle recommends keeping the configuration directory separate from the ORDS product directory, because this makes upgrades and maintenance easier.
Step 7 — Add ORDS to PATH
Add C:ordsbin to your Windows PATH. Open a Command Prompt and execute:
ords –help
If everything is correct, ORDS should display its command-line help. You can also check:
ords version
Step 8 — Verify Oracle Database Connectivity
Before installing ORDS, make sure the ORDS server can reach Oracle Database. For example:
Database Host : localhost
Listener Port : 1521
Service Name : ORCL
Test:
sqlplus system@localhost:1521/ORCL
Then enter the password. If this connection works, ORDS should be able to reach Oracle Database using this connection information.
Step 9 — Decide Where ORDS Will Be Installed
This matters. If your Oracle Database 19c is configured as a container database with a pluggable database:
CDB
└─ PDB
you normally install ORDS into the PDB, rather than treating the entire CDB like a traditional non-CDB Oracle Database. For example:
CDB: ORCLCDB
PDB: ORCLPDB
Check your environment:
SHOW CON_NAME;
SELECT name, open_mode FROM v$pdbs;
If you are using a PDB, switch to it:
ALTER SESSION SET CONTAINER=ORCLPDB;
Then verify with SHOW CON_NAME; it should return ORCLPDB. Oracle’s ORDS documentation has separate procedures for non-CDB/PDB installations and multitenant environments, so this distinction matters.
Step 10 — Create the ORDS Configuration Directory
Create:
mkdir C:ords-config
Tell ORDS to use this directory by specifying it explicitly:
ords –config C:ords-config install
This is the current ORDS installation syntax. Do not start a new installation with the old:
java -jar ords.war
Oracle now recommends the ORDS command-line interface.
Step 11 — Start the ORDS Installation
Run Command Prompt as an administrator/database installation account and execute:
ords –config C:ords-config install
ORDS will start asking installation questions, covered in the steps below.
Step 12 — Select the Database Connection Type
You will see options to select the Oracle Database connection type to use:
[1] Basic [2] TNS [3] Custom Oracle Database URLFor our example, select 1 (Basic Connection). You will then provide the Oracle Database host name, listener port, and service name. For example:
Host: localhost
Port: 1521
Service: ORCLPDB
Use your own Oracle Database values.
Step 13 — Oracle Database Administrator Credentials
ORDS needs privileges to install its Oracle Database components. For a lab installation you can use:
Username: SYS
Role: SYSDBA
Oracle also provides an ords_installer_privileges.sql script for when you want to use a dedicated installation account instead of SYS. The current documentation specifically describes this option for PDB installations.
Recommendation: For a lab installation, use SYS AS SYSDBA. Once the installation is working, build a controlled setup using a dedicated ORDS installer account.
Step 14 — The ORDS_PUBLIC_USER Account
During installation, ORDS configures its runtime user, ORDS_PUBLIC_USER. You may be prompted to:
[S] Specify your password [G] Generate password [C] CancelFor a controlled environment, specify a password. Do not use a weak password such as “oracle” use a strong, unique password instead.
Step 15 — Tablespaces
You may see prompts for the default and temporary tablespaces. The default values are generally:
Default Tablespace : SYSAUX
Temporary : TEMP
For a 19c installation you can generally accept SYSAUX and TEMP, unless your organization’s Oracle Database standards specify dedicated tablespaces.
Step 16 — Select Additional Features
Current ORDS releases provide options such as:
[1] Database Actions [2] REST Enabled SQL and Oracle Database API [3] REST Enabled SQL [4] Oracle Database API [5] NoneOracle’s current installer documentation lists Database Actions as the default option. For a learning environment, option [1] Database Actions is recommended, it gives you a complete ORDS environment to explore.
Step 17 — Configure Standalone Mode
ORDS can run in Standalone Mode. You may be asked:
Configure and start ORDS in Standalone Mode?
Choose:
Yes
For a lab installation this is the easiest way to validate the complete setup. Oracle documents Standalone Mode directly through the ORDS CLI and ords serve.
Step 18 — HTTP or HTTPS
You will typically see:
[1] HTTP [2] HTTPSFor a lab/test installation you can choose 1 and use port 8080, so your URL will be:
http://localhost:8080/ords/
Oracle documents 8080 as the default HTTP port and 8443 as the default HTTPS port.
Production recommendation: For production, HTTPS should always be used. Oracle specifically recommends HTTPS when running ORDS standalone.
Step 19 — Start ORDS
If you chose to configure and start Standalone Mode during installation, ORDS may start automatically:
ords –config C:ords-config serve
You should see startup messages indicating that ORDS is listening. For example:
INFO: Oracle REST Data Services initialized
INFO: HTTP listening on port 8080
Step 20 — Test ORDS
Open your browser:
http://localhost:8080/ords/
If ORDS is working, you should receive an ORDS response/page. You can also test this from another machine by replacing localhost with the ORDS server’s hostname or IP address, provided Windows Firewall and network configuration permit it.
Step 21 — Verify ORDS Database Objects
Connect to your Oracle 19c database:
SELECT username FROM dba_users
WHERE username LIKE ‘ORDS%’;
You should see users such as:
ORDS_METADATA
ORDS_PUBLIC_USER
You can also inspect:
SELECT username, account_status FROM dba_users
WHERE username IN (‘ORDS_METADATA’,’ORDS_PUBLIC_USER’);
Step 22 — Check the ORDS Version
From Windows:
ords version
This confirms the ORDS software version.
Step 23 — Check the ORDS Configuration
You can inspect the configuration using:
ords –config C:ords-config config list
The available configuration commands can be explored with:
ords config –help
Oracle recommends using the ORDS CLI for configuration management.
Step 24 — Test With a REST-Enabled Schema
Now we move from installation to Oracle Database REST services. Suppose we have:
CREATE USER RESTUSER IDENTIFIED BY “StrongPassword”;
Grant privileges according to your use case. Then REST-enable the schema:
BEGIN
ORDS.ENABLE_SCHEMA(
p_enabled => TRUE,
p_schema => ‘RESTUSER’,
p_url_mapping_type => ‘BASE_PATH’,
p_url_mapping_pattern => ‘restuser’,
p_auto_rest_auth => FALSE
);
COMMIT;
END;
/
The schema can now be accessed through an ORDS URL. Conceptually:
http://localhost:8080/ords/restuser/
Step 25 — Create a REST API
Create a simple table:
CREATE TABLE employees (
employee_id NUMBER PRIMARY KEY,
employee_name VARCHAR2(100),
department VARCHAR2(100)
);
Insert sample data:
INSERT INTO employees VALUES (1, ‘Muhammad’, ‘IT’);
INSERT INTO employees VALUES (2, ‘Ahmed’, ‘Finance’);
COMMIT;
You can now expose this table through ORDS using REST definitions or AutoREST, depending on the API design you want. This is where ORDS becomes more interesting than just installing a web server.
Step 26 — Understand the Architecture
After you install ORDS, your environment looks like this:
Internet / LAN → Client (Browser / App)
↓ HTTP/S
ORDS (port 8080 / 8443)
↓ JDBC
Oracle Database 19c
- ORDS_METADATA
- ORDS_PUBLIC_USER
- Application Schema (SQL / PL/SQL)
Understanding this architecture is essential before you start building REST APIs and Oracle APEX applications on top of ORDS.
Step 27 — Important Production Considerations
Installing ORDS successfully does not mean you have a production-ready environment. Before going to production, review the following areas:
Security
- HTTPS for ORDS
- Authentication and authorization
- Least-privilege database accounts
- Firewall rules
- Secrets and password management
Performance
- Connection pool sizing
- Database connection limits
- SQL performance
- JVM configuration
- Application workload
Availability
- Multiple ORDS instances
- Load balancing
- Database high availability
- Data Guard
- Backup and recovery
Monitoring
Monitor the full request path:
ORDS → JVM → Connection Pool → Oracle Database → SQL / PL/SQL
Step 28 — Common Installation Problems
Problem 1 — Java version
If you see an error that Java is too old, check:
java -version
Current ORDS releases require Java 17 or later.
Problem 2 — Database connection failure
Check:
lsnrctl status
tnsping ORCLPDB
sqlplus system@localhost:1521/ORCLPDB
Problem 3 — Wrong service name
Do not confuse SID with SERVICE_NAME. For a PDB, ORDS should normally connect using the PDB’s service.
Problem 4 — Database requests fail
Check the ORDS configuration, database connectivity, the ORDS_METADATA and ORDS_PUBLIC_USER accounts, and the connection pool.
Problem 5 — Port 8080 already in use
Check Windows:
netstat -ano | findstr :8080
If another service is using 8080, configure ORDS to use a different port.
Step 29 — Installation Checklist
At the end you should be able to confirm each of these:
- Oracle Database 19c is running
- Listener is running
- Java 17 is installed
- JAVA_HOME is configured
- ORDS is downloaded, extracted, and added to PATH
- A separate ORDS configuration directory is created
- Database connectivity is verified
- ORDS is installed in the database
- ORDS_METADATA is created and ORDS_PUBLIC_USER is configured
- Standalone Mode and HTTP/HTTPS are configured
- ORDS is started
- Browser/API connectivity is tested
- A REST-enabled schema is tested end to end
The Most Important Point
Do not think of an ORDS installation as “I installed ORDS and the service started.” Think of it as an architecture: Oracle Database 19c → ORDS → REST API → Application.
Once you understand that architecture, the next level becomes much easier:
Installation → Configuration → REST-Enabled Schema → REST Modules → REST Templates → REST Handlers → Authentication → Security → Production Deployment
- ORDS - Professional Edition
ORDS - Professional Edition